
Tuesday, December 21, 2010
Happy Holidays!

Well, I am a headin' East tomorrow and want to wish everyone a Merry Christmas and a very Happy New Year! I am so excited to be in Brooklyn for the holidays this year....lots of places to visit too.
Here's a partial list:
Blue Apron Foods -for great cheeses, chocolates and charcuterie....
Frankie's 457 -for the best BLT ever and a Bloody Mary to wash it down!
Purl Soho-to actually see all the beautiful wools I see on their blog....
Eataly- to see what all the hype is about!
Babycakes- to have a gluten-free treat!
Pearl River Mart-to stock up on some basic tea towels, bowls and chopsticks.....
Moma store- 'cause it's loaded with cool designs in home goods and I love Muji designs....
Sahadi's- it wouldn't be a trip home without going here to get some olives, nuts, cheese and other great stuff at incredible prices.....
Blue Ribbon- for oysters of course! and to say hi to my friends there......
Prime Meats- another gem owned by the "Franks" and a new found fave......
Frannie's- haven't had any pizza yet that's this good in Brooklyn!
Pulino's- love, love, love A16 in San Fran so want to see what Nate Appleman's got going on in NYC....
Notice how most of my stops involve food? What can I say....
See you all back here in the new year....until then, Happy Eating!!
XO,
Joanne
Thursday, December 16, 2010
Making a Difference with Coffee

Did you know that currently one in four people with developmental disabilities such as Down syndrome, autism and cerebral palsy are employed?*
Well, Aspire CoffeeWorks knows this and they also know that when given a chance, these folks can flourish and be vital in the community. This is why they launched a joint venture with local roaster, Metropolis Coffee Company, to help create new jobs. Aspire is one of metropolitan Chicago's leading human service non-profits that is helping to change the lives of adults and children with disabilities. They are dream makers! And the really big deal here is that 100% of their net proceeds from the sales of their coffee go to their programs that are truly life-changing.
So, go to their website and order some coffee- you can also help make a difference!!
 Here are the three blends they offer....great gift idea, so what are you waiting for??
Tuesday, December 14, 2010
The Baker's Workhorse: The Stand Mixer
 For years I coveted one of these...but the purist in me kept winning out (that and uh, the price tag!) But a couple of years ago, I took the plunge and got myself this time-and-life-saving machine.
This weekend, I was able to prep and bake at least three times the amount of holiday goodies as I would have with just my trusty whisk and wooden spoon method. I love that you can walk away while it happily churns your ingredients together! And clean up is a cinch with just the bowl and paddle to contend with. ( I put the bowl in the dishwasher so even better)
The price for stand mixers can be anywhere from $199.99 all the way up to and over $1000.00- I chose the KitchenAid for it's reputation, reliability and the fact that there are so many colors to fit any decor. I had used one before and felt that it was easy to use and with ten speeds, had the right amount of power.
Cuisinart came out with a stand mixer a few years ago- and it has gotten some great reviews from Cooks Illustrated for it's excellent ability to plow through heavy bread and pizza doughs. And now I am seeing that Breville also has joined the mixer category with their version-a powerful 550 watt motor and a "load sensor" that will keep the machine moving at precision speed when it detects a heavier load. Wow- technology is amazing.
So if you love to bake, then maybe it's time to put one of these on your wish list and hey, maybe Santa will be good to you this year!
Thursday, December 9, 2010
Simple Carrot Soup

Cold days scream for hot soup and it seems you just can't find a good bowl of soup anywhere these days- it's so easy to make too so I wonder why this is? It's times like this I think I should open up a "soup bar" and solve this issue (at least in my neck of the woods!)

This recipe is based on one of Alice Waters' recipe from The Art of Simple Food, and it couldn't be any easier or simpler to throw together. It's up to you if you want to vary it by adding yogurt, for instance, or spice it up with jalapeño and cilantro even throw in some toasted cumin seeds.
Here is what I did:
Saute one onion, sliced thin, in 2 tablespoons of butter.
Cook over medium-low heat until translucent, about 10 minutes.
Add 1 pound carrots, peeled and sliced (about 3 cups). I added one sliced jalapeño here and some chopped cilantro.
Season with salt and cook for about 5 minutes to blend the flavors.
Add 4 cups of broth ( I used chicken, but you can use vegetable stock as well- water is not going to give it enough depth of flavor but you can use it in a pinch).
Bring to a boil, lower heat, and simmer for about 30 minutes until carrots are tender.
Cool off and puree in a blender.
Top with more cilantro and toasted cumin seeds.
Yield: about one quart

Yumm!
Tuesday, December 7, 2010
Rustic Holiday Decor

felted owl ornaments from crateandbarrel.com
For whatever reason I am really crazy for the rustic woodland sort of look this Christmas-and there are so many options too! From ornaments to lights, garlands and wreaths...now all I need is an idyllic cabin in the woods and I will be all set!


Sunday, December 5, 2010
Roasted Pumpkin Risotto with Crispy Pancetta

It's no secret that I love at least two maybe three things (at least for this post!).
1. risotto
2. pancetta
3. Jamie Oliver
I love how Jamie makes risotto and for me, it always turns out great no matter which recipe of his I happen to follow.
Here what I did was take his basic risotto recipe and added my version of roasted pumpkin with sage and shallots- the pancetta I just crisped up in the oven with some fresh sage leaves and served it right on top. It's really a comforting and satisfying meal on a cold night.
To make the roasted pumpkin:
1 small sugar pumpkin, approx 2 lbs
4 shallots, peeled and quartered
2 good sprigs fresh sage leaves
2-3 tbsp olive oil
1. Preheat the oven to 400°.
2. Peel, seed and cut pumpkin into 2 inch pieces (you can save the seeds and roast them like I did and serve a few on top as garnish!)
3. Toss pumpkin, shallots and sage in olive oil and spread out on a sheet pan.
4. Roast for approx. 30 minutes, turning about midway.
After you have roasted the pumpkin (and you can do this ahead of time, in fact it's easier that way) and it has cooled off, chop it a bit finer (yes it will be a bit mushy but this is okay). Add it to the risotto at Stage 3 and you are just about done.
It wouldn't be complete without some crispy pancetta to top it with (you could use bacon too) and all I did was bake a few pieces in my toaster oven at 375° while I was making the risotto.
Hope you enjoy!
Friday, November 26, 2010
Surprise! It was a gluten-free pie!


Wednesday, November 24, 2010
Happy Thanksgiving!
 image from epicurious.com
I am sure that everyone out there is in some kind of frenzy right now between shopping, prepping, and figuring out seating arrangements for the family and friends that are soon to gather together.
My charge this year is to make dessert- a pie (which is so fun) and I have decided to use a recipe from the very last issue of my all time favorite food magazine, Gourmet. Their very last issue consequently, was November of 2009 so I feel it's a perfect choice for this occasion and it reminds me of how I have gone to Gourmet for inspiration many times over the years.
Here is the link to the recipe for Cranberry-Apple Crumble Pie just in case this inspires any of you out there.....
Have a happy and delicious day!
Tuesday, November 16, 2010
Banana Bread

Who doesn't love a warm loaf of banana bread on a cold day? I have been making banana bread for many years and in all this time I had never thought to add chocolate to the mix- so this time I did in fact add some chunks of dark chocolate and it made such a difference! Kinda a cross between a breakfast and a dessert- but who says you can't have chocolate for breakfast anyway?
The beauty of this is that it's so easy to make and if you make it in mini loaf pans, it will make for some tasty holiday gifts.
The ingredients:
2 eggs
1/2 cup organic cane sugar
1/2 cup brown rice flour
1/3 cup rolled oats
2/3 cup quinoa flour
2 oz coarsely chopped dark chocolate (70 % cocoa)
1 teaspoon baking powder
1/2 teaspoon baking soda
1/2 teaspoon ground cinnamon
1/2 cup chopped walnuts
7 tablespoons butter melted and slightly cooled
1 apple, peeled, cored and grated (use any apple good for baking)
2 ripe bananas, mashed with a fork
Method:
1.Preheat the oven at 350 F and butter a loaf pan. Coat it with either flour and tap the excess out and set aside.
2. In a bowl, combine the flours with the oatmeal, baking soda, baking powder and ground cinnamon and set aside.
3. In the bowl of your stand mixer, beat the eggs with the sugar until light. Add the butter and mix. (you can use a hand mixer as well)
4. Stir in the apple and bananas using a wooden spoon or rubber spatula
5. Fold in the flours and chocolate and nuts and mix until just combined.
6.Pour the batter into the pan and bake the cake for 30 to 35 minutes.

Thursday, November 11, 2010

Friday, November 5, 2010
Friday Inspiration

I was having one of those days when I needed something but just couldn't figure out exactly what it was. I came across this book while browsing at Anthropologie and I couldn't put it down. There are some great words of encouragement and I found it was exactly what I needed!
"Your vision of where or who you want to be is the greatest asset you have."
All of us want to be good at our jobs, but how good do we really want to be?
Quite good.
Good.
Very good.
The best in our field.
Or the best in the world?
Talent helps, but it won’t take you as far as ambition.
Everybody wants to be good, but
not many are prepared to make
the sacrifices it takes to be great.
To many people, being nice in
order to be liked is more import-
ant. There’s equal merit in that,
but you must not confuse being
good with being liked.
Most people are looking for a
solution, a way to become good.
There is no instant solution, the
only way to learn is through
experience and mistakes.
You will become whoever you want to be.
Happy weekend!

Sunday, October 31, 2010

Saturday, October 30, 2010


Saturday, October 23, 2010
Walnut Chocolate Chunk Cookies

With the turn of the weather the other day, I suddenly was craving chocolate chip cookies. Here was another chance to experiment with the gluten-free baking craze I am on. These cookies came out light and crunchy on outside, with a tender middle. I used some very dark chocolate, just chopped it into chunks. I have decided I much prefer this than the chips you buy in the bags.
Here's the thing though that I am finding about gluten-free baking- I think if you can do it, using butter and eggs really makes the difference. I have noticed that a lot of gluten-free recipes seem to also be dairy free as well. I suppose because one intolerance goes with the other- if you are allergic to wheat and gluten products you are more than likely allergic or intolerant to dairy products as well. But if you can tolerate dairy and oats (in this recipe) then these might be the cookies for you. You can substitute the oats with quinoa flakes and you can find them here. (I have not been able to find at my local Whole Foods). I also used walnuts, but use what you like- pecans, hazelnuts, slivered almonds etc....
Here is what to do:
Ingredients:
- 1 - 1/3 cup brown rice flour
- 1/3 cup quinoa flour
- 1/3 cup quinoa or oat flakes
- 1/3 cup amaranth flour
- 1 cup organic sugar
- 2 eggs, at room temperature
- 1/2 cup butter, at room temperature
- 1/2 tsp baking powder
- 1/2 tsp baking soda
- 1/2 tsp salt
- 1 tsp pure vanilla extract
- 3/4 cup coarsely chopped chocolate (70% cocoa )
- 1/2 cup walnuts, pecans or slivered almonds
Method:
- Preheat the oven to 350 F. Line your baking sheets with parchment paper or use silpat liners.
- In a large bowl, whisk together all the flours, quinoa or oat flakes, baking soda, baking powder, and salt; set aside.
- In a large bowl, or the bowl of your stand mixer equipped with the paddle, beat the butter until light, then beat in the sugar.
- Stir in the vanilla extract.
- Mix for a few minutes and then add the eggs, making sure the first one is well incorporated before adding the second — scrape down the sides of the bowl a few times.
- Add the flour mixture slowly, until incorporated-do not over mix.
- Stir in the chocolate and nuts.
- Place 1 large Tbsp of dough for each cookie onto the baking sheet, making sure to keep them about 2 inches apart.
- Bake the cookies for about 12 minutes, until the edges start to be golden in color; transfer to racks to cool. Eat right away, or store in airtight container.
Thursday, October 14, 2010
Gluten-free Goodness

So, I have been experimenting with gluten-free baking and I have to say that it's really amazing how far the gluten-free choices have come. I have tried many products over the past several years, and it's been hard to find something that doesn't taste, well, like cardboard! It seems I have an "intolerance" to wheat products that has gotten worse over the past couple of years-and I just can't imagine having to live without baked goods-I mean who can really? All that comfort that comes from baking and eating the finished products...I think people these days are getting more and more wheat intolerant-due to genetic and environmental factors and there is a clear and present movement in progress to offer alternatives to those of us afflicted.
Babycakes, a bakery in NYC, has become almost famous for their gluten-free cupcakes....and now doughnuts! I will definitely go check those out on my next visit back east. They are quite successful at eliminating not just the gluten, but other allergens like dairy, soy, casein, and even eggs. They use agave to replace refined sugar as well. I have had these cupcakes and you really don't miss these things! It's truly amazing.
But I digress......back to my experiments.
Enter my new discovery: Quinoa flour. I am sure you have heard of the grain but when ground into a flour, it becomes something completely different- I like the texture it offers, and the fact that it is high in protein, makes it even a better choice. Bob's Red Mill is an excellent source if you don't have Whole Foods in your area.
I made a Swiss chard tart using a combination of quinoa, rice and tapioca flours. And somehow, I really didn't miss the wheat. There was a sort of nutty crunchy texture to it and I am very pleased with how it turned out.

Here is the recipe for the crust:
- 1 cup brown rice flour
- 1/3 cup tapioca flour
- 1/3 cup quinoa flour
- 1/4 cup quality olive oil
- 1/4 cup water
- 1 egg
- Pinch of salt
1. In a large bowl, whisk all flours with the salt .
2. Make a well in the middle and break the egg. Work into the dough until incorporated, then add the oil.
3. Finish with the water, enough for the dough to form a ball. Wrap in a plastic wrap and place in the fridge for 2 hours until firmer.
4. Roll out the dough and set into a tart pan with a removable bottom. (spray with oil to make it easier to remove later) Refrigerate until ready to fill with any type of custard- (I used swiss chard and goat cheese with my egg custard).
5. Bake at 350 for 35-40 minutes until set.

Stay tuned for more recipes........
Monday, October 11, 2010
Kitchen Equipment:Part One
When it comes to setting up one's kitchen with all the gadgets, cookware and such needed to turn out some decent meals, we can really get overwhelmed! Believe me I know! As a former buyer of all things for the cook, the amount of product in the marketplace can send your head spinning round- not to mention make a big dent in your wallet!
Don't despair! I am here to help! I have composed my list of what I call "essentials" and I thought I would share those with you along with a video from Jamie Oliver's new show, 30 Minute Meals (sadly only being broadcast in England!) where he shares his absolute essential list to get you "kitted out"!
It seems he and I are totally in agreement with what you really need to make it happen in your kitchen- and you don't need to spend a ton of money either. While his video gives a quick run down, I will give you more details and some links to some of my recommended items. There are things I am absolutely adamant about too, and made sure my customers did not leave the store without- and I will make mention of those magical items in this and the next post, Kitchen Equipment: Part Two.
Remember: You can find great deals these days at outlet stores, flea markets and antique shops. In fact, I love using older gadgets as they were made so much better years ago! (I think one of my flour sifters is circa the 50's).
Let's start with the small appliances first (and remember you can build your "batterie de cuisine" over time).
1. Blender- comes in handy for pureeing soups and sauces- not to mention for smoothies and frozen cocktails! You can get a decent blender or "liquidator" as Jamie calls it, for less than $100 new, but make sure it can handle ice cubes- that is key! Kitchenaid's 5 speed blender is getting some high marks for it's ice crushing ability and it's right around that $100 price range too.
2. Food Processor- now this differs from the blender in that it has a shredding/grating blade and a dough blade offering more variety and deeming it a real "workhorse" in your kitchen. I prefer this to a blender for making homemade mayonnaise too. (Here is one of my must-haves! A food processor was the very first electric item I purchased when I got my first job out of college- it has never let me down!) I have a Cuisinart but Kitchenaid also makes a good one-and definitely get the larger one (either the 12 cup or the 14 cup) anything smaller, is just not worth it. You should expect to pay around $200 for either of these models if purchased new.
3. Hand Mixer- now Jamie didn't mention this item but I think at the least if you are a baker you need to have one of these. Later, a stand mixer would be a great investment if you've been bitten by the baking and pastry bug-it will make your life a lot easier and quicker. Again Cuisinart and Kitchenaid make some really powerful hand mixers and they are easy to find. (check out the links to the ones I like)
4. Immersion Blender- this is a stick-like blender that you may have seen the chefs on Iron Chef use and it's great for quickly pureeing soups right in the pot you are cooking in! Again, not totally essential but a "nice to have" item.
5. Electric Water Kettle- Hands down the fastest way to boil water! No kidding. They are widely used in Europe and the UK and with good reason. We are not as used to them on this side of the pond, but they are gaining in popularity and demand. Cook's Illustrated loves this one. I myself have yet to get one of these in all honesty...my habit of the kettle on the stove is hard to break!
As far as cookware is concerned: I don't recommend cookware sets- simply because they always seem to have the sizes or styles you don't want. Cherry picking your pieces will give you a more custom and personal collection of the pots and pans you really need. Not all material will give you the same results as you will see below.
1. Skillets- sometimes called a fry pan. Skillets will come in standard sizes of 8, 10, 12 and even 14 inch. These almost never come with lids (that's what you get a saute pan for.)
I would highly recommend having at least 2-3 skillets in various sizes. One of them should be a good non-stick. This one is highly recommended for only $29.99! Non-stick is great for doing eggs and/or fish and anything you don't want to stick. Another one of your skillets should be cast iron for searing a steak or meats. Lastly, I think stainless steel works really well, especially if it's triple ply. I adore and highly recommend this one by All-Clad- so worth the investment. It's a "french" skillet with the sides being higher than a standard fry pan and it's a sort of meet-in-the-middle kind of thing for me-I can use it almost like a saute pan when a lid isn't required.
2. Saucepans- again, totally necessary for anything from sauces to cooking rice, oatmeal and such. I highly recommend at least 2 sizes here but if you can do it- go for 3. Great sizes would be: 1, 2 and 3 quart. Get all your bases covered here. You really don't need to have non-stick either. Just some good ol' thick bottom stainless steel is just fine. Cuisinart, and/or All-Clad are my top picks here-they will last you a lifetime and then some so worth every penny. And did I mention that you can put stainless steel in the dishwasher? Easy clean up is always a plus for me.
3. Specialty pans- here would be your dutch ovens, saute pans, grille pans (or griddle pan as Jamie calls it) and stock pots. A classic Dutch oven like Le Creuset is great if you are ready to invest the big bucks, but there are many other comparable ones now that would be a little easier on the pocketbook like Mario Batali's and Lodge Logic. At least a 5 quart and up is the best size to get so you can do roasts and stews and have plenty of room. As far as the grill pans go-I happen to have a great cast iron grille pan from Lodge and it's been with me for a long time-was inexpensive too. Saute pans differ from fry pans in that they have high straight sides and come with a cover. They are great for braising and for making larger quantities than you ordinary fry pan-again here I would try a tri-ply stainless for best results. Stock pots I recommend would be stainless steel and do get at least an 8 quart so you can cook your pasta in plenty of water. If you plan on making stock or soups a lot, a 12 quart would be a great addition. This one has great features and an affordable price tag too!
4. Roasting/Baking pans- I say invest in a good roasting pan- especially if you plan to do the traditional holiday meals. I would recommend a stainless roaster, with substantial handles like this one recommended by Cook's Illustrated. And always have at least 2-3 "sheet pans" on hand. I like these. They are so great for not just cookies and baking, but I use my sheet pans to roast veggies and more.
Stayed tuned, because my on next post, we will go over knives, cutting boards, tools and various gadgets essential to making your kitchen hum like a well oiled machine!
Wednesday, September 29, 2010
Heath Ceramics
 all photos from Heath Ceramics
I started collecting Heath Ceramics back in 2008, when I was shopping for some new dinnerware. They are one of the few remaining mid-century American potteries and with a crew of only 60 people (with many of them there 20 years plus), it makes for a very special company. Located in Sausalito CA, they were founded by Edith Heath in 1948, an influential potter and designer of the Modernist era.
In 2003, husband and wife team, Robin Petravic and Catherine Bailey purchased Heath Ceramics with a mission to revitalize the company, by placing a strong emphasis on design, handcrafted techniques, and the reinvigoration of the company’s designer-maker legacy.
Chez Panisse, Brasserie 44 at the Royalton Hotel, and The Slanted Door are just a few of the top restaurants who use their dinnerware. Nice!
I am mad about their designs, and have a long list of what I want to add next. The simple clean lines and the earthy colors say it all.....


Tuesday, September 28, 2010
Bento Box Mania
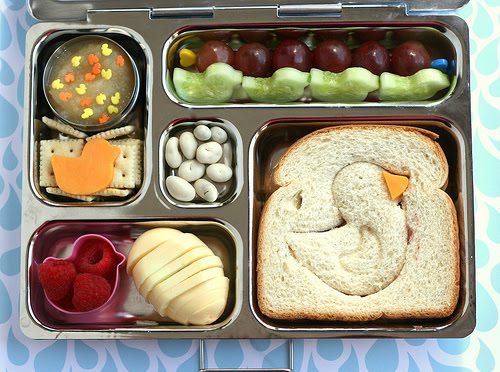
I gotta give a shout out to a very cool Mom from the blogoshere at AnotherLunch.com. I am just in awe of her website and her creativity with her kid's lunches. Bento boxes are a very tidy way to serve food but what an even greater way to coax your little ones into eating more variety. Can cute and healthy live together in the same sentence? It certainly can.....have a look at some of these combinations. Boy, I wish my Mom could have know about this! Great work Melissa!


Monday, September 27, 2010
Killa Salad Dressing

Cherry Belle, Red King, White Icicle, French Breakfast, Plum Purple, Gala and Roodbol, Daikon, Black Spanish.....just a few of the names of the many varieties of radishes that grow in the world! Grown seasonally, and super easy to grow at that, I am just obsessed with these lovely little beauties and their peppery goodness.
This weekend I picked up a pale pink variety at the farmer's market, and was so pleased at the gorgeous little red centers that were hiding inside after I cut into them.
My all-time favorite way to eat them is straight up into a green salad: sliced super thin with my Japanese mandoline.
I happened to have The Cooking Channel on when I was composing my salad, and Jamie Oliver was making a salad- he made this most amazingly simple dressing that I gotta say, made my radishes taste even better....
All he did was slice a few shallots super thin (hence why I love the mandoline!) and put a couple of tablespoons of vinegar and a pinch of salt on them in a bowl and left them to macerate for a few minutes. He then squeezed them out and scattered on the salad....the next part is what I deemed as "killa"- he took some creme fraiche (maybe 1/2 cup?) and added a tablespoon of vinegar, and 2 tablespoons of olive oil, salt and pepper. I used yogurt and I used sherry vinegar, but I think you can vary the vinegar to your liking- just use good quality!
I normally don't make this type of dressing- not sure why either. Tart but creamy and so simple too. I think I will be keeping this one.
What are some of your favorite salad dressings?
Sunday, September 12, 2010
Tomato-Sausage Risotto

Who doesn't like a hot steaming bowl of risotto on a cool crisp fall day? I look forward to this time of year when we can indulge ourselves in the pleasure of what I think is the ultimate comfort food. There are several varieties out there of risotto rice, however, the principal varieties used in Italy are Carnaroli, Vialone Nano and Arborio. Carnaroli and Vialone Nano are considered to be the best (and most expensive) varieties, but I have been using the Arborio variety pretty exclusively and have been happy with the results. The thing all these varieties have in common is there high starch to low amylose ratio that gives the finished dish it's classic creaminess.
I have made this recipe that follows for I would guess, over a decade now, and I never get tired of it. It's from Cucina Rustica by Vivian La Place and Evan Kleiman. (pub 1990, William Morrow and Company) This is a fantastic meal to serve when you have a few people round, and you can hang out in the kitchen and take turns stirring....sipping wine while doing this is practically a necessity!
Risotto Rosso
2 tbsp unsalted butter
3 tbsp extra-virgin olive oil
1 medium onion peeled and finely chopped
1/2 lb of sweet Italian sausage, removed from casings and crumbled
4 garlic cloves, peeled and minced
2 cups imported Italian tomatoes, crushed
15 fresh basil leaves, coarsely chopped
2 cups Arborio rice
1/2 cup red wine
5-6 cups beef or chicken stock
salt and freshly ground black pepper to taste
1 cup grated Parmesan cheese, plus additional for table
1. Melt the butter and olive oil in a heavy 2-qt saucepan. ( a dutch oven works great here). Add the onion tot he pan and cool slowly over low heat until it is very soft and just begins to take on color.
2. Add the crumbled sausage meat and garlic, cook over moderate heat until the meat no longer shows any pink. Add the tomatoes with their juice and the basil. Cook for approx 10 minutes, or until the tomatoes and meat form a slightly thickened sauce.
3. Add the rice, and, stirring constantly, cook until the rice absorbs all the sauce. Add the red wine and cook slowly, stirring constantly, until it is completely absorbed.
4. Meanwhile, heat the beef or chicken broth, until it is very hot. Turn the heat off, but keep the broth hot on a warm burner. Add the hot broth to the rice one ladleful at a time, stirring frequently. The rice should cook very slowly over low heat. Wait until all the liquid is absorbed before adding the next ladleful of broth. Midway in the cooking time, add salt and pepper.
5.When the rice is just barely tender, add the Parmesan cheese and a knob of butter. Turn off the heat and stir vigorously until all the butter and cheese are absorbed.
 buon appetito!!
Monday, August 30, 2010
Summer in the City

I have to admit I have been a bit lazy about posting anything the past couple of weeks...it's not that there is nothing going on mind you, but I think I have the "summer fever"- you know when you just get that lazy feeling....you just want to sit back and drink lemonade and hang out in the hammock and contemplate life....( I wish I was doing that!)
Anyway, I managed to get my lazy butt (with the motivational prodding of a friend's visit), to the Chicago Botanic Garden. A fairly short ride from downtown, the garden is located in Glencoe right off of Lake Cook Road. How very sad that it took me two years of living here to actually set foot in this magical place! If you have not been, I highly urge you to go- it's the place that will take all your troubles away as you commune with the beauty around you......here are a few of the pictures where I captured the magic...see what you think.....


Subscribe to:
Posts (Atom)


